

by Arwen Brenneman
Over the past few decades, construction has taken an increased role in public safety and security. “Use at your own risk” is still true, but good site design is expected to mitigate those risks. Bollards have taken a larger role in offering protection or guidance. The Federal Emergency Management Agency (FEMA) guidelines, widely adopted by civic institutions in several countries, offer ways to prevent terrorist and ram-raid thefts through perimeter security. Popularized in Sweden, vision-zero guidelines, offer environmental strategies to decrease traffic injury and fatality.
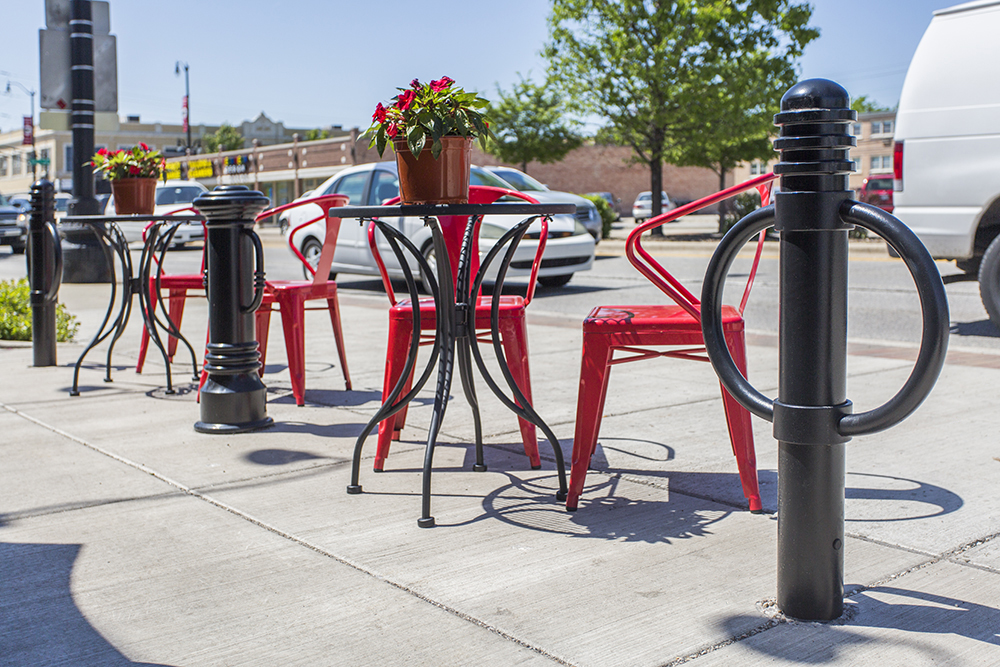
Safety, security, and asset protection strategies may call for bollards, but the little posts are often designed to blend in. Due to their short stature and small footprint, they can be easy to forget. Bollards are also the sort of item that may be changed late in the game for aesthetic or budgetary reasons.
Whether the bollards were initially forgotten, or whether large orders or changes to design mean order lead times are longer than expected, last-minute additions can cause real stress. If the project timeline is set back, the budget can be threatened. Project leads can feel torn between holding off on pouring concrete or ripping up existing sidewalk—neither seem like a great option.
Fortunately, bollards can be installed into existing concrete, saving both money and time. Procedures for this installation depend on whether the bollards need to be impact-protective or just serve as guideposts.
Installation of traffic guidance bollards
Although impact-protective and anti-terrorist bollards make news headlines, most bollards do not need target hardening. Traffic guidance bollards are often not impact-protective. In the case of flexible bollards, they may be chosen explicitly because they bend on impact.
Removable bollards, like those beside a plaza or at the end of a loading bay, are often placed to prevent casual parking or drive-through access. Even though they are not anti-ram, they are still effective as drivers will not crash into them to get a parking space. A bolted metal bollard will cause damage to a vehicle hitting it with any speed, whether it is impact-protective or not.
Bollards are also used in pedestrian areas where impact protection is unnecessary. Decorative bollards connected with chains might structure a lineup outside a venue, protect a garden, or discourage people from cutting across the edge of a lawn.
Fortunately, installing these bollards into existing concrete does not require too many tools. For example, a drill with a masonry bit and a handful of other inexpensive supplies can do the job.
Although it is unlikely there will be utilities or pipes at the depths required for setting bollards into existing concrete, it is advisable to always check to ensure there are no underground hazards before beginning installation.
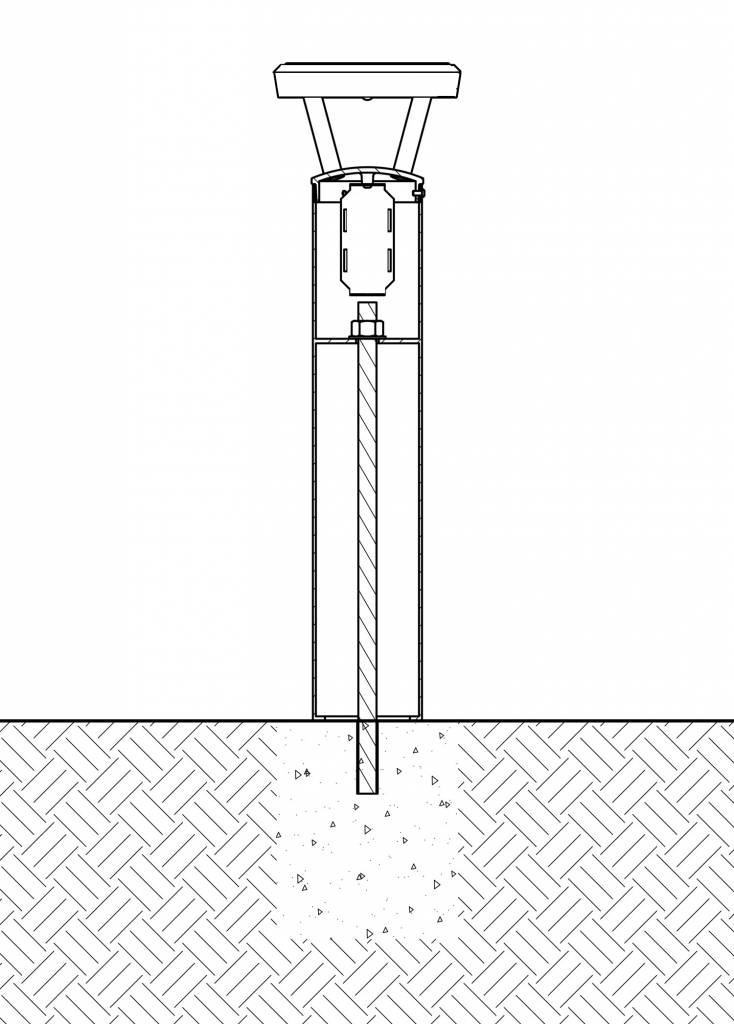
Installation using threaded steel rods
Internal threaded rods are used to help with mounting and keep the bollard plumb. Rods are commonly employed as cap or frame anchors when set into the concrete of impact-protective pipe bollards. They can also be handy as a bollard mounting.
Threaded rods are substantial, usually 6 to 25 mm (¾ to 1 in.) in diameter, and made of steel. Depending on the type of bollard, a rod can run through the bollard and be both anchor at base and place to secure the bollard cap.
Installing bollards with adhesive
Adhesive anchors are a quick way to set a threaded rod into concrete. The upside is in speed and ease of installation. The downside is the rod will need to be drilled out if the bollard is removed.
In vehicle collisions with the bollard, it is more common for the rod to bend than snap or be pulled free. Crashes may therefore lead to drilling.

