ListView is one of the most widely used widget in Android Application, it’s main usage is to show a list of child objects.
Most common scenario is using it to display a list of objects of the same type, but when you need to display more than one lists in the same Activity, you have to put them in one ListView, but writing custom Adapters to wire them up.
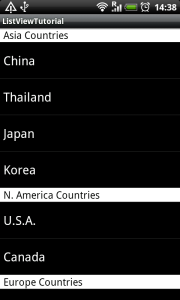
In this tutorial, we are going to do this in MVVM way with Android-Binding, which you can do all this work, in the layout instead of writing them in back end code. By the end of our tutorial, we would have something like this:
Source code for the tutorial is available in the project page.
Step1 – Create Project
Start Eclipse, choose File > New Project > Android Project, just like any other normal Android projects, put in package names and those stuff, and you should have a clean Project similar to the one below:
Step2 – Link Android Binding Library
Next, we need to link the Android-Binding Library. Simply right-click on the Project name (ListViewTutorial), and then choose Build Path -> Add External Archives:
After clicking that one, a file selection dialog shows up, and put in the downloaded Android-Binding.jar into it. (you may download the latest one here).
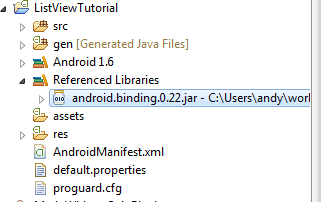
After selecting the library file, your project folder should look like this:
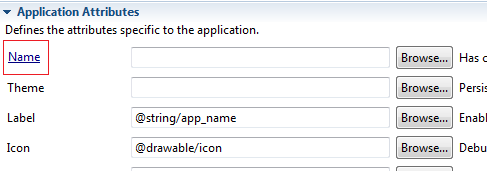
Now, double-click on “AndroidManifest.xml”, and choose the “Application” Tab. Click on the underlined Name, we want to add an application class associated to this project.
After clicking on it, a dialog asking you to name a new class is show up:
Put in the name, and leave everything else as-is, and click Finish.
Now, the newly created Application class appears, put in the following:
package gueei.binding.demos.listView;

import gueei.binding.Binder;
import android.app.Application;

public class ListViewTutorialApplication extends Application {
	@Override
	public void onCreate() {
		super.onCreate();
		Binder.init(this);
	}
}
Nothing much different than the default, except that we include a Binder Object, and called init(Application) to it. This is the only setup code we need to start using Android Binding.
Step 3 – Coding our View Model
We can now move on to code our View Model, which, we are going to supply the Country names to it, by continent; For simplicity reason, we prepare our names with simple String arrays, right in the Activity class:
        private static final String[] Asia = new String[]{
		"China", "Thailand", "Japan", "Korea"
	};

	private static final String[] NAmerica = new String[]{
		"U.S.A.", "Canada"
	};

	private static final String[] Europe = new String[]{
		"U.K.", "Italy", "France", "Spain", "Netherlands"
	};
We also need those string to be Public Observable, so, in the Activity class, we put:
        public ArrayListObservable AsiaList =
		new ArrayListObservable(String.class);
	public ArrayListObservable NAmericaList =
		new ArrayListObservable(String.class);
	public ArrayListObservable EuropeList =
		new ArrayListObservable(String.class);
Declaring public observable denotes that these properties are observable by the View. Since they are coming from array source, the type would be ArrayListObservable. An ArrayListObservable is very similar to the normal java.util.ArrayList, except that this is compatible to the Binding mechanism used by Android-Binding.
Lastly, in the onCreate method of our activity class, we need to specify the content View we are going to use, and also initialize the content of the above mentioned lists.
    @Override
    public void onCreate(Bundle savedInstanceState) {
        super.onCreate(savedInstanceState);
        AsiaList.setArray(Asia);
        NAmericaList.setArray(NAmerica);
        EuropeList.setArray(Europe);
        Binder.setAndBindContentView(this, R.layout.main, this);
    }
Again, for make things simpler, we double the role of the activity and ViewModel, but in practice, create a separate class for ViewModel would be much better. The Binder.setAndBindContentView tells the Binder to parse the layout xml, and also set the content view of the activity to that.
Step 4 – The Markup
Here is the basic markup we have:
<?xml version="1.0" encoding="utf-8"?>
<LinearLayout
	xmlns:android="http://schemas.android.com/apk/res/android"
	xmlns:binding="http://www.gueei.com/android-binding/"
    android:orientation="vertical"
    android:layout_width="fill_parent"
    android:layout_height="fill_parent"
    >
<ListView
    android:layout_width="fill_parent"
    android:layout_height="wrap_content"
    binding:itemSource="AsiaList"
    binding:itemTemplate="@layout/list_item"
    />
</LinearLayout>
We simply want a list view to see the content of the arrays. Note that the line xmlns:binding=… at the very beginning of the document, all Markups in Android-Binding is under that particular namespace. In the ListView, I included binding:itemSource=”AsiaList” and binding:itemTemplate=”@layout/list_item” to specify the source of items and how it looks like respectively.
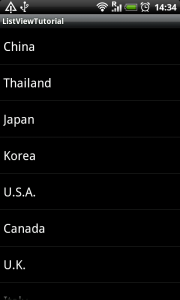
Now you can try to run, and you should have the following:
Step 5 – Displaying multiple list
OK, now we can display one list, but we want to display all three lists, right?
Simplest idea is, we create three ListView in our xml, laying out one by one from top to down, and supplying them with different itemSources.
Bad news is, it cannot be done (OK, it sort of works if all the lists contains stuff less than a screen). The ListView, LinearLayout will reject to work in that way.
In usual Android programming, the work-around is to make a custom adapter (well, you always need to create this). In Android Binding, we do it in a different way.
Back to the Layout file, this time, we use the Converters mechanism in Android Binding to offload the work.
<ListView
    android:layout_width="fill_parent"
    android:layout_height="wrap_content"
    binding:itemSource="ADAPTER({source=AsiaList, template=@layout/list_item})"
    />
We start with bit-by-bit. Instead of putting multiple attributes, we can use ADAPTER() to specify itemSource and itemTemplate in one statement. Run the above example and nothing should change (but at least it works).
WHY? The ADAPTER() converter creates an adapter (item source and template combo), and we can put multiple adapters to it, so we can display more than one list of objects (and they can be of different types, different look).
In order to put multiple adapter, we need to STITCH() converter to do the magic:
<ListView
    android:layout_width="fill_parent"
    android:layout_height="wrap_content"
    binding:itemSource="STITCH(
    		ADAPTER({source=AsiaList, template=@layout/list_item}),
    		ADAPTER({source=NAmericaList, template=@layout/list_item}),
    		ADAPTER({source=EuropeList, template=@layout/list_item})
    	)"
    />
Run the code, you would have:
A single list which the data from three different lists.
Step 6 – Extra finishes
Now, we want to add a separator so that we can visually group those items. Built-in to Android Binding, there are a SECTION() converter takes the name and layout of the section:
SECTION('DISPLAY NAME', @layout/LAYOUT)
The SECTION() (Header) Converter itself is a singleton adapter (a set with one and only one entry). So, you can chain this into the input of STITCH() Converter (stitch means stitch different adapters to make one adapter, as input for ListView itemsource).
Putting the following in the xml layout:
    <ListView
    android:layout_width="fill_parent"
    android:layout_height="wrap_content"
    binding:itemSource="STITCH(
    		SECTION('Asia Countries', @layout/section_name),
    		ADAPTER({source=AsiaList, template=@layout/list_item}),
    		SECTION('N. America Countries', @layout/section_name),
    		ADAPTER({source=NAmericaList, template=@layout/list_item}),
    		SECTION('Europe Countries', @layout/section_name),
    		ADAPTER({source=EuropeList, template=@layout/list_item})
    	)"
    />
yields the final product:
Final words
In the example, we are putting list of objects of the same kind, which in practice, we have ExpandableListView to do the job (we will cover how to use Android Binding on that kind of lists later). Notice since every single list can have different templates, sometimes you can have finer control on the interfaces with this approach.


Thank you very much for sharing this!
very interesting and great job.
Can you put the sample code link here
They are all available in the MarkupDemo -> MultipleAdapters, for instance here is the link to it: http://code.google.com/p/android-binding/source/browse/trunk/AndroidBindingMarkupDemo/
Is there a way to hide the SECTION if the ADAPTER’s source is?
empty.
Thanks for this it works great for me. However I was curious if there is a easy way to hide a section’s header if the adapter’s source is empty?
I think no at the moment. You should think about implement your own “Stitch” and “CombineAdapter” logic. It shouldn’t be too difficult to do.
where is layout file “list_item”
infact i have created my own “list_item” layout and place following code in that file
but its giving me error anyways..
plz help me out.
Can you post your code here? And better, post your code in the discussion group, we have lots of other experienced user can help solving your problem: http://groups.google.com/group/androidbinding?hl=en_US
And i am getting followinf exception:
04-22 01:29:54.091: W/System.err(1784): gueei.binding.exception.AttributeNotDefinedException: The view does not have attribute (id: itemTemplate) defined.
Hi i have i found it very useful but tell me one thing i want to add some button or some more text view along with country in list_item how can i access them in my Listcountries class as that is given in sample code and add listeners on them and if it is not possible tell me any other way of doing it or refer some sample code to me thanks
First let me clarify. We normally don’t touch any listeners directly in View Models, since View Models should be not aware how the Presentation layer is doing.
Yes, you can add buttons to your list_items, please take a look at the MusicPlayerDemo(https://play.google.com/store/apps/details?id=com.gueei.demo.musicplayer&feature=search_result#?t=W251bGwsMSwxLDEsImNvbS5ndWVlaS5kZW1vLm11c2ljcGxheWVyIl0.)
Each row of the item there, we have a rating bar. And whenever the rating is changed, (just like clicking a button), the view model is notified and saving the results. You can have the source code in our project homepage: http://code.google.com/p/android-binding/source/browse/Demos/trunk/MusicPlayer+AndroidBinding+Demo/
let me explain my point further is that i am not directly accessing the elements of list_item.xml it is through main4.xml as given in sample code so i want to add some button and in list_item and want to access it in listcountries activity how can i do that
And the Markup Demo is somewhere you should start with, if you are interested in MVVM and android-binding. It’s on the project homepage as well. (http://code.google.com/p/android-binding/)
Would this be possible with a custom listview? (with a modified list item layout)
Thanks..
Yes. You can provide the custom layout using itemTemplate, moreover, any subclass of listview can be used.
This could be a simple solution if you work with static items. But if you work with dynamic data, this is not a solution.
can you give some example? since you can put anything in the item template (layout), you can even switch child layout during run time.
Thank you for the tutorial, however I would have one question: the method you invoked in Binder.setAndBindContentView(this, R.layout.main, this) seems to be deprecated. What type of replacement could be suitable for it?
One more question: could you explain a bit deeper where exactly do we have to place the contents of the xml regarding the layout and the list? Thank you in advance.
in layout folder, just like standard android way.
please check the MarkupDemo (https://github.com/gueei/AndroidBinding/tree/master/Demo) for references
Check demo
https://github.com/gueei/AndroidBinding/tree/master/Demo